Fetching remote data
Many Packs use cases require fetching data from an outside source such as an API, which is done using the custom Fetcher interface. Other methods for making network requests in JavaScript (such as XMLHttpRequest or libraries like axios or jQuery) are not supported.
Network domains
Before you can start making any requests using the fetcher, your Pack must declare which domain names it is going to communicate with. This can be done using the addNetworkDomain() method of the pack:
pack.addNetworkDomain("example.com");
The fetcher can to communicate with URLs on that domain and all sub-domains. It's usually best select the root domain of the service you are working with. For example, if you want to make requests to api.example.com, add the network domain example.com, in case you later determine you need to access related content on images.example.com, etc.
By default a Pack is only allowed to register a single domain. This is done to limit abuse potential and provide transparency to users. If your use case requires making requests to multiple domains you may request an exemption by contacting support.
Accessing the fetcher
The fetcher is made available in the execute method of a formula through the context object. This object is the second parameter of the execute method, after the array of formula parameters set by the user:
pack.addFormula({
  // ...
  execute: async ([foo, bar], context) => {
    let fetcher = context.fetcher;
    // ...
  },
});
In metadata formulas, such as those that determine autocomplete choices or connection names, the context is the only parameter:
coda.makeParameter({
  // ...
  autocomplete: async (context) => {
    let fetcher = context.fetcher;
    // ...
  },
}),
Making requests
The fetcher has only one method, fetch, which accepts an object containing the settings of the request. The method and url fields are required, with other fields like headers and body as optional. You can see the full list of supported fields in the FetchRequest interface.
context.fetcher.fetch({
  method: "GET",
  url: "http://www.example.com",
});
By default the fetcher runs asynchronously, meaning that the code will continue on to the next line even if the server hasn't responded yet. You can get the fetcher to behave synchronously the using the async/await paradigm. Make sure the outer function is declared using the async keyword and then use the await keyword to tell your code to wait for the server's response before continuing on.
pack.addFormula({
  // ...
  execute: async ([], context) => {
    let response = await context.fetcher.fetch({
      method: "GET",
      url: "http://www.example.com",
    });
    // Any following code won't run until the response is received.
  },
});
In parallel
If you want to make multiple requests in parallel you can instead kick off all of your requests, wait for them all to finish, and then look at the results. This requires some understanding of Promises, but basically follows a pattern like:
pack.addFormula({
  // ...
  execute: async ([], context) => {
    let urls = [
      // The URLs to fetch in parallel.
    ];
    let requests = [];
    for (let url of urls) {
      // Kick off the request.
      let request = context.fetcher.fetch({
        method: "GET",
        url: url,
      });
      requests.push(request);
    }
    // Wait for all the requests to finish.
    let responses = await Promise.all(requests);

    for (let response of responses) {
      // Do something with the response.
    }
  },
});
Sending data
Many API requests involve sending data to an external server, usually using a POST or PUT request. To do so using the fetcher, just set the method property to the desired method and pass the data you want to send in body property. You'll usually want to set a Content-Type header as well, which tells the server what format the data is in.
let response = await context.fetcher.fetch({
  method: "POST",
  url: "https://httpbin.org/post",
  headers: {
    "Content-Type": "text/plain",
  },
  body: "This is some plain text.",
});
JSON
Sending JSON is just like sending text above, except you typically define the payload as a JavaScript object first and then convert it into a string using JSON.stringify(). In addition, you'll need to set the Content-Type header to application/json.
let payload = {
  foo: "bar",
};
let response = await context.fetcher.fetch({
  method: "POST",
  url: "https://httpbin.org/post",
  headers: {
    "Content-Type": "application/json",
  },
  body: JSON.stringify(payload),
});
Form data
To send data to a server that expects form input (application/x-www-form-urlencoded) use the form property of the request. It takes key-value pairs and automatically encodes, passes them in the body, and sets the correct Content-Type header.
let response = await context.fetcher.fetch({
  method: "POST",
  url: "https://httpbin.org/post",
  form: {
    name: "Alice",
    active: true,
    days: 15,
  },
});
Sending attachments (multipart/form-data) is not supported.
URL query parameters
To send data in the URL query parameters, simply append those parameters to the URL passed to the fetcher. For example, http://www.example.com?foo=bar&thing=true. The SDK provides a helper function, coda.withQueryParams() that simplifies the process of encoding and appending query parameters to a URL.
let url = coda.withQueryParams("http://www.example.com", {
  foo: "bar",
  thing: true,
});
let response = await context.fetcher.fetch({
  method: "GET",
  url: url,
});
Binary
Sending binary data (files, images, etc) is currently not supported by the fetcher.
Working with responses
If your request was successful it will return a FetchResponse object, which contains the status code, headers, and body of the response. Depending on the format of the response (determined by the Content-Type header) the body may already be parsed for you.
Text
Except for the special content types described below, the response body will be returned as plain text.
let response = await context.fetcher.fetch({
  method: "GET",
  url: "https://www.example.com", // Returns an HTML page.
});
let html = response.body;
let bodyStart = html.indexOf('<body>');
JSON
Responses with the content type application/json will be automatically parsed into a JavaScript object. This allows you to start accessing the data without needing to first call JSON.parse().
let response = await context.fetcher.fetch({
  method: "GET",
  url: "https://api.exchangerate.host/latest?format=json",
});
let parsed = response.body;
// How you access data in the parsed JSON object depends on the contents.
let rate = parsed.rates["USD"];
XML
Responses with the content type application/xml or text/xml will be automatically parsed into a JavaScript object, using the library xml2js. Specifically, every XML element is converted into a JavaScript object, where the keys are the name of child elements and the values are the contents of those elements. Even when an element only contains a single value it is always returned within an array. The special key $ reserved for attributes on the element. For example:
<basket pending="true">
  <item quantity="1">
    <name>Bread</name>
    <cost>$5</cost>
  </item>
  <item quantity="5">
    <name>Apple</name>
    <cost>$1</cost>
  </item>
</basket>
{
  "$": {
    "pending": "true"
  },
  "item": [
    {
      "$": {
        "quantity": "1"
      },
      "name": [ "Bread" ],
      "cost": [ "$5" ]
    },
    {
      "$": {
        "quantity": "5"
      },
      "name": [ "Apple" ],
      "cost": [ "$1" ]
    }
  ]
}
During development it is a good idea to log the parsed JavaScript object, so that you can more clearly understand the structure of the parsed XML.
let response = await context.fetcher.fetch({
  method: "GET",
  // Open this URL in your browser to see what the data looks like.
  url: "https://api.exchangerate.host/latest?format=xml",
});
let parsed = response.body;

// Log the parsed XML, for reference when developing.
console.log(parsed);

let usd = parsed.data.find(item => item.code[0] === "USD")
let rate = usd.rate[0];
Binary
When fetching binary data, enable the request option isBinaryResponse to let the fetcher know that it shouldn't try to parse the server response. When binary responses are enabled the body field of the response object will contain a Node.js Buffer.
let response = await context.fetcher.fetch({
  method: "GET",
  url: "https://cataas.com/cat", // Returns a random cat image.
  isBinaryResponse: true,
});
let buffer = response.body;
let byteLength = buffer.length;
Errors
When a request fails (a response code of 300 or higher) the fetch will fail with a StatusCodeError exception. This exception contains useful information about the failed request, including the full response body.
let response;
try {
  response = await context.fetcher.fetch({
    method: "GET",
    // Open this URL in your browser to see what the data looks like.
    url: `https://dog.ceo/api/breed/snoopy/images`,
  });
} catch (error) {
  // If the request failed because of a non-200 status code.
  if (error.statusCode) {
    // Cast the error as a StatusCodeError, for better intellisense.
    let statusError = error as coda.StatusCodeError;
    // If the API returned an error message in the body, show it to the user.
    let message = statusError.body?.message;
    if (message) {
      throw new coda.UserVisibleError(message);
    }
  }
  // The request failed for some other reason. Re-throw the error so that it
  // bubbles up.
  throw error;
}
Headers
The HTTP headers returned can be accessed using the headers field of the response. The header names are normalized (changed to lowercase) for convenience, so you can access them consistently regardless of how they are sent by the server.
let contentType = response.headers["content-type"];
Unless it's a known safe header, all the header values will be redacted by Coda (contain the value <<<REDACTED by Coda>>> instead of the actual value). To request that a specific header be unredacted you will need to contact support.
Authentication
The authentication you configure for your Pack is automatically applied to fetcher requests, with no extra code needed. For example, if you have set up HeaderBearer authentication, an Authorization header with the user's token will be automatically added to your fetcher requests. This is only done for formulas that use a connected account: those that have a connectionRequirement of REQUIRED, or OPTIONAL and the user opted to selected an account.
To disable this behavior for a specific request within a formula, set the fetch option disableAuthentication: true.
let response = await context.fetcher.fetch({
  method: "GET",
  url: `https://www.example.com`,
  disableAuthentication: true, // No auth will be applied to this request.
});
Caching
For performance reasons the Packs runtime caches the HTTP responses for GET requests, meaning that your code may not always be getting the latest response from the server. You can adjust this behavior by setting the cacheTtlSecs field in the fetch request, which specifies for how many seconds the response should be cached. To disable caching for a request set that value to zero.
Info
In addition to caching fetcher responses, Coda also caches the results of formula executions. To get truly fresh results you may need to disable that caching as well.
Rate limits
Making a request to an external API can be expensive, either due to quotas, computing resources, or monetary cost. To help prevent your code from making too many expensive API calls you can set up rate limits for your Pack. To configure these, open the Pack editor and click on Settings > Add rate limits.
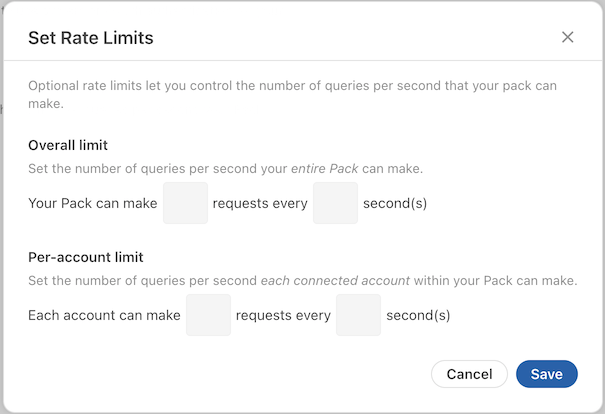
You can set a total rate limit across all users of your Pack, or if your Pack uses authentication you can also set a per-user rate limit. When the limit is reached your formula will pause for a bit to see if more quota becomes available, and if not eventually fail with an error.